Jshushij
Elevated Bloon


Posts : 16791
Age : 28
Fuji Bucks™ : 29487
Reputation : 227
 |  Subject: How to Post a Tutorial Tue Oct 12, 2010 9:09 pm Subject: How to Post a Tutorial Tue Oct 12, 2010 9:09 pm | |
| Title:- [Program Used] Name of Tutorial
Ways to post the tutorial:- Make a picture
This can be done in two ways. One is to post the picture itself into your post. The other is to post a link to your tutorial.
- Use the pre-made table
Code: - Spoiler:
- Code:
-
[table width="95%" style="border:1px solid #000000;background:#ffffff;"][tr style="background:#e8e8e8;"][td height="100px" background="http://i296.photobucket.com/albums/mm174/jshushij/Website%20Stuff/FujiPlanetText.png" style="background-repeat:no-repeat;background-position:center;padding:5px; text-align:right; font-weight:bold; font-size:20px;"]
[/td][/tr][tr style="background:#cccccc;"][td style="padding:2px;"][center][size=20][b][/b][/size][/center]
[size=20][b]Title[/size][/b]
[color=#f37d14][u][b]Overview[/b][/u][/color]
[i][color=#f37d14]Level:[/color][/i]
[img]http://www.regionivapo.org/rosie/images/ranks/stars-1.gif[/img]
[img]http://www.regionivapo.org/rosie/images/ranks/stars-1-5.gif[/img]
[img]http://www.regionivapo.org/rosie/images/ranks/stars-2.gif[/img]
[img]http://www.regionivapo.org/rosie/images/ranks/stars-2-5.gif[/img]
[img]http://www.regionivapo.org/rosie/images/ranks/stars-3.gif[/img]
[img]http://www.regionivapo.org/rosie/images/ranks/stars-3-5.gif[/img]
[img]http://www.regionivapo.org/rosie/images/ranks/stars-4.gif[/img]
[img]http://www.regionivapo.org/rosie/images/ranks/stars-4-5.gif[/img]
[img]http://www.regionivapo.org/rosie/images/ranks/stars-5.gif[/img]
[i][color=#f37d14]Estimated Completion Time:[/color][/i]
[color=#f37d14][b][u]What We Are Making[/u][/b][/color]
[color=#f37d14][b][u]The Instructions[/u][/b][/color]
[color=#f37d14][b][u]The Finished Result[/u][/b][/color]
[/td][/tr][tr style="background:#e8e8e8;"][td style="padding:2px;"][center][color=black][size=9]Notice: This tutorial is copyrighted to Fuji Planet.
It may not be published with permission from an administrator.[/size][/color][/center][/td][/tr][/table]
It should look like: - Spoiler:
Example- Spoiler:
|
Jewelry Text Tutorial
Overview
Level: 
Estimated Completion Time: 10 minutes
What We Are Making
Today we will be making this image:

The Instructions
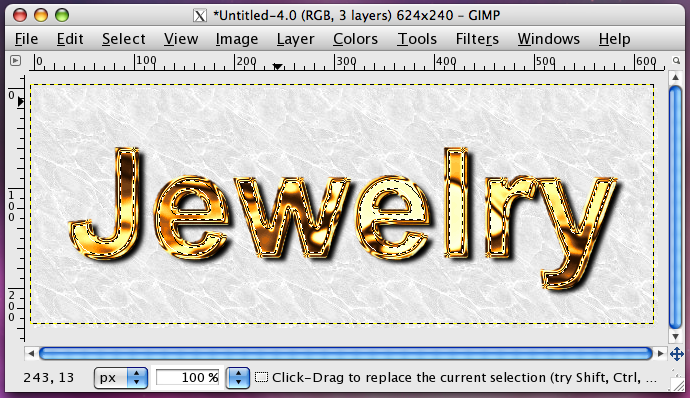
1. Go to File>Create>Logos>SOTA Chrome, type in the text that you wish, and make these your settings:

You should have this so far:

2. Delete the top layer, titled "Chrome".

3. Right click on the "Highlight" layer and click Apply Layer Mask (Layer>Mask>Apply Layer Mask). Next, make a selection using the Rectangle Selection Tool that covers all of the text, but none of the border.

4. Go to Select>Invert and Edit>Cut (same as pressing ctrl+i and ctrl+x) on the "Highlight" layer. Now go to the "Drop Shadow" layer and go to Edit>Cut (same as pressing ctrl+x). You can now go to Select>None (same as pressing ctrl+shift+a).

5. On the "Highlight" layer right click and press Alpha To Selection (Layer>Transparency>Alpha To Selection). Then, go to Select>Shrink and shrink the selection by 5 pixels.
6. Make a new layer and put it on the very top of the layers (I would name it "Diamond") and fill it with white (#ffffff). Next, go to Filters>Noise>HSV Noise on the new layer. Make these your settings:

You should now have this:

7. Go to Filters>Distorts>Emboss and make these your settings:
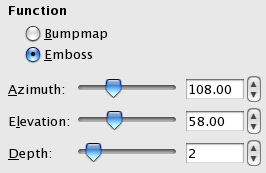
You should now have this:

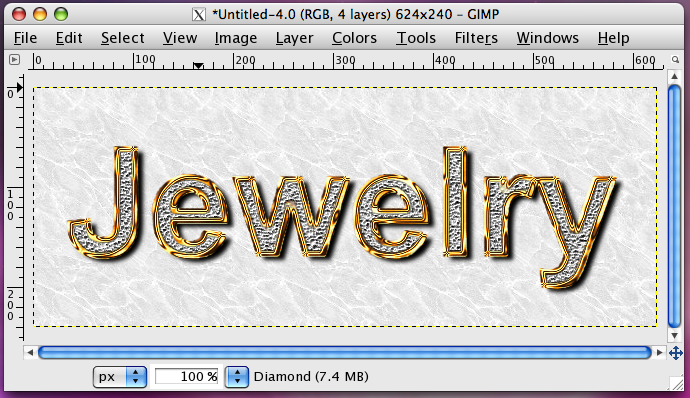
8. Go to Select>None (ctrl+shift+a). Then, go to Filters>Map>Bump Map. The settings should be- Bump Map: (your top layer), Map Type: Linear, and check off "Invert Bumpmap". The settings should be:

Now you should have:
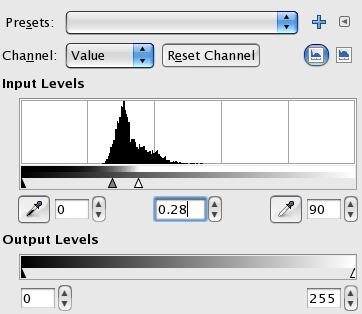
9. Right click on the top layer and press "Alpha To Selection" (Select>Transparency>Alpha To Selection). Next, make a new layer and put it on top of all the other layers. Fill the selection in the new layer with the pattern "Electric Blue" (it automatically comes with Gimp). Now go to Select>None (ctrl+shift+a). Then, go to Colors>Desaturate and check off "Lightness". Finally, go to Colors>Levels and make these your settings:
Now your image should look like this:

10. On the top layer, change the layer mode to "Hard Light".

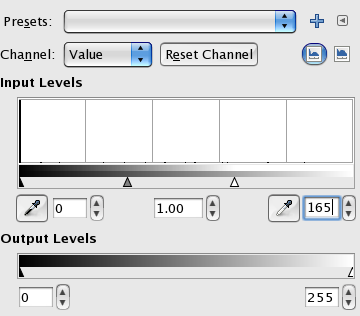
11. Go to the second-to-top layer and then go to Colors>Levels and make these your settings:

You should now have:

12. Make a new layer and put it on top all the other layers. Fill it with black (#000000). Go to your brush tool (make sure that white is your foreground color) and use the "Diagonal Star (25)" brush (it comes with Gimp). Now, set the layer mode to "Screen". Now brush in various places, the edge of a letter is the best spot, about in about 5 different places to make the text sparkle and stand out.

13. Go to the background layer and then go to Colors>Brightness-Contrast and set the Brightness to -100 and the Contrast to 40.

14. Go back to the top layer and go to Colors>Levels and make these your settings:
You should have something similar to this:

15. Pick your "Highlight" layer and then go to Colors>Hue-Saturation. Set Hue to 2, Lightness to 25, and Saturation to 16.

You have finished!
The Finished Result
I hope this tutorial helped you guys!
| Notice: This tutorial is copyrighted to Fuji Planet.
It may not be published with permission from an administrator. |
Last edited by Jshushij on Sun Oct 17, 2010 4:44 am; edited 2 times in total |
|